Skip to Main Content or Page Contents
Brackets Editor Tutorial
Brackets Editor Tutorial
Brackets Editor Introduction
Getting Started - The Brackets Editor Workspace
This Page's Contents

Download Brackets
Download Brackets Web Editor from brackets.io/
Double Click the downloaded file to install
Open The Brackets Editor
When brackets opens it opens with a project installed
What is a Project?
- A project is the name of the folder that contains within it all the files links and additional folders that are required to produce the web pages that you require.
- The project name is the same as the containing folders name
The Project on a New Installation of Brackets
- Brackets Opens with the Getting Started Project
The Project on an Older Installation of Brackets
- Brackets Opens with the last project used. On the video it is my my-tutorials project and the file index.htm is an earlier version of this file
Examine the Brackets Workspace
The Brackets Editor Workspace
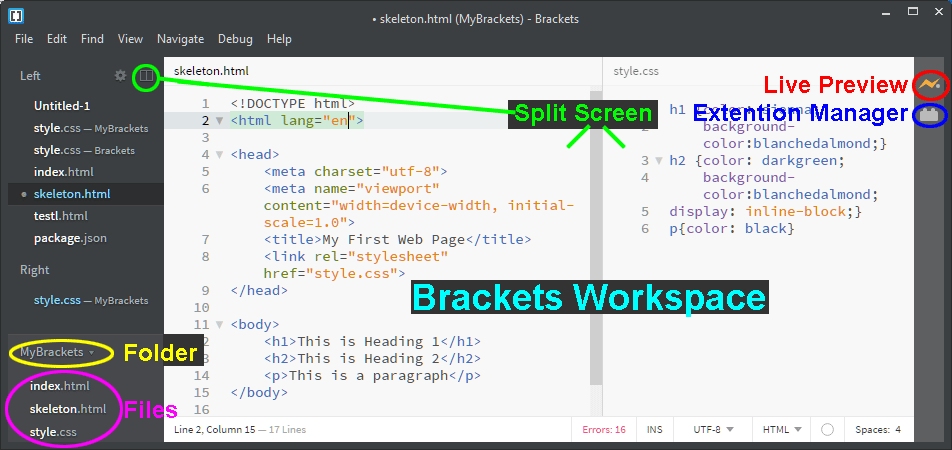
Fig.1 Brackets Editor Workspace

How to check the Project Name
The Project Name can be seen on the extreme top line of the Brackets Editor Window inside the parentheses, e.g.(Project Name) along with a file name and sometimes the file name is preceded with a folder path if the file is inside a folder that is inside the Project folder See Diagram
Before checking out the the Getting Started Project & the Workspace, we will make some improvement alterations to the workspace:
Brackets Live Preview
- Clicking the Grey lightening bolt Live Preview Icon near top right
or - Select File > Live Preview
or - Press Ctrl+Alt+P (Windows or Linux) or Ctrl+Alt+P (Mac)
Live Preview lightning bolt Icon Colors
- Grey: Live Preview not open
- Grey / Gold Half & half: Live Preview is loading
- Gold: Live Preview opens in the Chrome browser in a separate window.
- Red: There is an error in your HTML code. This occurs when you start a new line with < and stays red until you enter the rest of the tag such as <p> then it turns back to gold
Half the icon turns gold as the The Live Preview is loading & then all of the icon turns gold when Live Preview opens in the Chrome browser in a separate window.
Brackets Getting Started Project
A Brackets Project
A Brackets Project name is actually the name of the containing folder that contains the projects files and any nested additional folders.
When brackets first starts after it has been installed it is has the Getting Started Project already loaded as the current project.
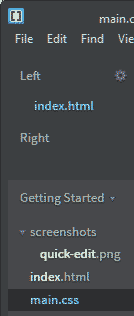
These files are:
The Getting Started Folder contains index.htm an HTML5 file, main.css an External CSS file & a screenshots folder containing quick-edit.png A graphic screenshot image. (See Fig 2.
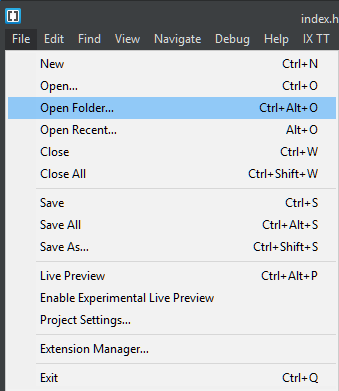
Brackets File Menu
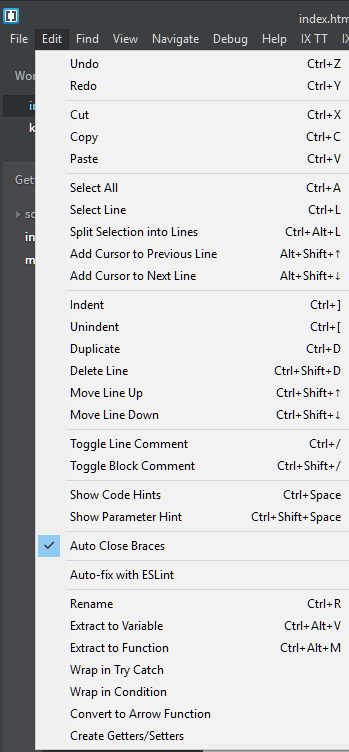
Brackets Edit Menu
Brackets View Menu
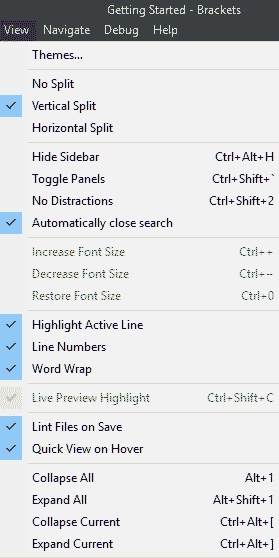
Themes...
Two themes are available:
- The default Light (as used in our screenshots)
- Brackets Dark
- Additional themes can be downloaded via Extensions. More information:
No Split Vertical Split Horizontal Split
Choose how many coding panes you require. These action can also be achieved by clicking the Split Icon
- No Split. Only 1 Coding pane.
- Vertical Split. 2 Coding panes arranged left & right. As Shown in Fig.1 Brackets Editor Workspace
- Horizontal Split.2 Coding panes arranged top & bottom.
Hide Sidebar Ctrl+Alt+H
Hide or show the left files sidebar. Useful if you require more main pane working space for coding.
Toggle Panels Ctrl+ Shift+‘
No Distractions Ctrl+ Shift+2
Hides the Sidebar & the thin right Icon panel giving Maximum main work space
Automatically close search
Ensure Selected (Ticked). Useful time saver.
Highlight Active Line
Ensure Selected (Ticked). Useful time saver. Helps to locate cursor.
Line Numbers
I prefer line numbers, useful if you validate your code. Can be toggled off if you require more workspace.
Word Wrap
Stops having to scroll right & left
Lint Files on Save
Brackets runs ESLint on JavaScript to check for errors when you open them. Ensure Ticked if you are using javascript.
Quick View on Hover
Ensure Selected (Ticked). 1 or 2,makes it easy to view assets and colors in your code. Just hover your mouse over a color, gradient, or image for a popup preview.
Collapse Expand
Note the triangle indicators next to some line numbers. Clicking on one of them collapse or expands that section of code. or use 1 of the 4 below options to collapse or expands the code. Useful to hide sections of code that you are not working on.
Collapse All Alt+1
All Alt+ Shift+1
Collapse Current Ctrl+Alt+[
Expand Current Ctrl+Alt+]
The view layout selected above will be remembered for the Lint Files on Save . You can have a different layout for a different project
Brackets Split Screen
The split screens allows the user to view 2 different files at the same time. In this tutorial I use the Horizontal Split Screen because I have a wide screen. Users of narrow screens may prefer the Vertical Split.
- Click View then Click Vertical Split
OR - Click Split Screen Icon then Click Vertical Split. See Fig above
- The screen is split 50% - 50% into a left & right column called panes
- The 50% - 50% width can be altered by dragging the central line to the left or right
- The left pane should contain the index.html file. Check the name in the top left corner of the left section.
- The right section should be empty except for a faint central logo & Hint top left: Open a file while this pane has focus
- Click in the right pane then double click main.css in the extreme left files column
- You can now view your HTML file & your Styling CSS file simultaneously. (See Fig 1 near the top of this Page
The magic of brackets starts when we open the Live Preview.
Brackets Live Preview
- Clicking the Grey lightening bolt Live Preview Icon near top right
or - Select File > Live Preview
or - Press Ctrl+Alt+P (Windows or Linux) or Ctrl+Alt+P (Mac)
Half the icon turns gold as the The Live Preview is loading & then all of the icon turns gold when Live Preview opens in the Chrome browser in a separate window.
In the right pane of Brackets holding the external cascading file sheet file main.css
Exercise in using brackets
- Look for line 25 & click on h2. The browser immediately highlights all lines with a h2 sub heading with a thick blue line above & below This makes it very easy to view changes to your css.
- Look for line 19. The h1, h2, h3, h4, h5, h6 this means that the following CSS within the {} brackets is to be applied to ALL headings h1 through to h6.
- Look for Line 20. & color code of #222, if you are familiar with hexadecimal color codes you may know this to be a very dark gray. More on color codes. If you are not familiar with colors Brackets will help you. Just hover the mouse over #222 & a popup displays the actual color.
- Drag over #222 the background changes to pale blue. Make sure that you do not include the semi colon ; & replace with the word red
- Note the immediate change to red of ALL the headings in the browser. Because your mouse is still after the d of red, the browser still highlights the headings with blue lines.
- With the cursor over the word red or any color code, we will bring up the popup, by either :
- A right click
or
Press Ctrl+E
- A right click
- Lets now create a simple but often created error. Just delete the semi colon ;
- Note how you have lost the red color and it has changed to a default black rather than very dark gray.
- Press Ctrl +Z to undo your last alteration and check that the semi colon ; has been replaced. Punctuation & some characters are very important in both CSS & HTML
Files, File Tree & Working Files
On the extreme left are the files in your project
When the main code section is not split into 2 panes you have the Working Files as the top group.
When the main code section is split into 2 panes the working the Working Files is replaced by either:
- Left & Right for a Vertical split
or - Top & Bottom for a Horizontal Split
How the working files are split between them is a bit of a mystery.
The bottom group of files is the file tree.
Between them is the click able project folder with a down triangle on the right. Clicking the project folder bring up a list of folders.
Working Files
The working files are a shortened duplicate list of files that are quicker to look through compared to the full file tree.
Clicking on a file in the file tree is viewable in the main pane but does not add it to the working files unless you edit it, then it is added.
Double-Clicking on a file in the file tree enters it into the working files list
Create a new project
here you need just to do this: File -> Open Folder -> /Users/myName/Sites/mySite
How to remove the Getting Started Project
Before removing the Getting Started project, please note that our tutorial uses the Getting Started project files for some of our pages
Open another project (folder), then open the project dropdown and click on the small 'x' against to close it
More Brackets Editor Pages
- Brackets Getting Started
- Brackets Top Extensions
- Brackets Top Themes
- Brackets Editor Quick Edit.htm
- Brackets Keyboard Shortcuts Cheat Sheet
- Brackets Install or Remove Extensions
- Brackets Keyboard Shortcuts Cheat Sheet
- Emmet Main Abreviations
Programs
Video Editor
Filmora 10 Video Editor
Hosting & Domains
Hostgator
This site is hosted on Hostgator
123 Reg
Bluehost
Anti Virus Software
Kaspersky
Norton
AVG
Web Site Templates

DVD Tutorials
Books
CSS: The Missing Manual
CSS Pocket Reference
Html5 and Css3 All-In-One for Dummies
Web Design
Build Your First Website In Simple Steps
Responsive Web Design with HTML5 and CSS3