Skip to Main Content or Page Contents

HTML5 & CSS 3 Tutorial
HTML Tutorial Dreamweaver
Additional instructions to tutorial 2 for using Dreamweaver to produce your web page
This Page's Contents
| Step 1. Set Up your new Site | |
| Step 2. Set up your working space. | |
| Information on 4, Dreamweaver 5 's Windows | Objects Panel Window Objects Panel Exercise 2. Customisation.
Document Window Site File Window Property inspector |
Step 1. Set Up a Local Site on Dreamweaver 5.5
- Click Site on the menu bar
- Click New site...
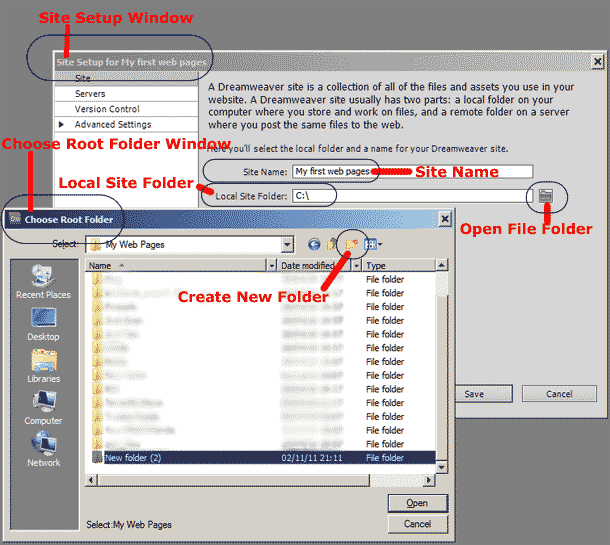
In the Site Set Up for Unnamed Site Window - In the Site Name Edit box, enter My first web pages
- Click the folder icon to the right of the Local Root Folder edit box
- In the Choose local folder window
- use the controls to select the where you wish to create your my-first-web-pages folder
- Click select.
- Click Save

Check in the Site files Window
- In the Site drop down list ensure my-pages-01 is selected.
- In the large Local folder pane underneath your folder my-first-web-pages should be visible
In future sessions ensure that my-pages-01 is selected as your site.
View Video
Step 2. Set up your Dreamweaver working space.
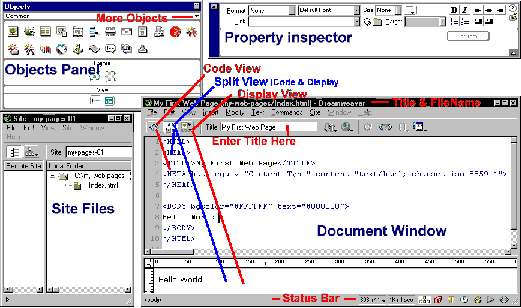
dreamweaver has an amazing number of windows that will confuse a beginner. The only windows that you require for the early lessons are the following:
- Object Panel.
- Property inspector
- Site File window
- Document Window which has
- A title bar: with title: Untitled 1 - Dreamweaver (or similar)
- A menu bar: File Edit View etc.
- A toolbar: with Buttons
- The main edit window consisting of either:
- A Code View
- A Design View
- 0r a split screen with both Code and Design Views
If any of the windows are missing they can be opened as follows.
Objects Panel, Property inspector, Site Windows from Windows on the menu bar.
Document Window from File on the on the menu bar
Close any other window(s).
The default orientation of the Objects Panel is vertical, rather than horizontal as shown in Diagram DW 1, below
Click on the image below for a printable larger view that you can use for reference.
Window layout Considerations
The main window that you work with is the Document Window, you want this as large as possible.
If you are just typing in text this window can be maximised.
If you are formatting the appearance of your page, or typing in text and formatting at the same time, then you require easy access to the Objects and Property Inspector windows. This is what you will be doing in the following exercises
The File window is required if you are changing to different document windows (pages of your site). The Document window can be enlarged to cover almost all of File window. This enlargement should be far more than shown in the Diagram DW 1., with much more of the File window, being covered. You will also be doing this in exercises in following tutorials.
The layout Starting with the layout shown in the Diagram DW 1., and enlarging the document window as above, the best to achieve these considerations.
Information on 4, dreamweaver's Windows
Objects Panel Window
Your vertical Objects Panel will look different to the customised one shown in Diagram DW 1. Why this was done and how it was achieved is explained below in customisation below.
This window contains buttons (the small icons) that when clicked will either
- insert objects elements onto your page (HTML Tags into your code).
- or display a Dialog box.
![]() Objects Panel Exercise 1. Familiarisation.
Objects Panel Exercise 1. Familiarisation.
- Hover the mouse over 1 of the buttons in the Objects Panel. Note how a descriptive caption pops up. All the buttons do this.
- Note that there is a name immediately below the title bar, it is probably Common. At the other end of this row is a little down pointing triangle called the menu button
- Click on the menu button. In the pop up window, note the list of Categories available:
Characters, Common, Forms, Frames, Head, Invisibles, and Special. - Click on Invisibles, you will be using the following 2 buttons in the early tutorials.
 Named Anchor.
  Comments.
- Click on the menu button. In the pop up window, note the list of Categories available:
- Click on Characters, you will also be using.
 Line break button.
 - Click on Common, you will be using the following 3 buttons in the early tutorials.
 Image.
  Table.
  Horizontal Rule.
In the lower portion of the window you have the Layout, and View sections. These buttons can be used to toggle between Layout View and standard view, when creating tables. You can create and amend tables in either of these views.
Objects Panel Exercise 2. Customisation.
Horizontal Orientation.
The size and orientation of this panel can easily be changed by clicking on an edge or corner of the window and dragging to a new size.
- Try this out now.
- Make the panel too small to display all the buttons. Note how a small arrow appears on the left.
- Click on the arrow to see how it works.
- I find the horizontal layout, as shown in Diagram DW 1. more suitable, when working, allowing easy access to all windows.
- If you wish to try this layout do it now.
Add Additional Buttons to the Common Category.
You will find that you are using only a few of the many buttons available. These buttons will be distributed through the various categories. To make the few that you do use more readily available, I recommend that you copy the buttons and add them to Common. The easiest way to do this is using Windows Explorer.
- Make a list of the button names you wish to add to Custom. Also make a note of the Category that button is in, by browsing through the Objects Panel.
- Open Windows Explorer.
- Navigate to the following folder and select it.
Program files, Macromedia, dreamweaver, Configuration, Objects. - Note. You should see folders corresponding to the Categories:
Characters, Common, Forms, Frames, Head, Invisibles, and Special. - From the list you made in 1. Open the corresponding folder.
- In that folder you will find either 2 or 3 files with the name of the button, the files will have extensions, .gif .htm, and .js if there is a third file. ( If Windows explorer is set up to show extensions).
- Copy all 2 or 3 files to the Common folder, for each button you require.
- Repeat steps 5 to 8 as required.
- Either
- close and reopen dreamweaver,
- or in the Objects panel Control click ( Option click on a Mac) the pop up menu triangle.
Click Reload Extensions.
Create your own Button category.
This can be very useful if you wish to have a category that contains a selection of the frequently used elements that you use.
- Carry out steps 1 to 4, as above.
- Create a new folder, File new.
- Type in the name you will use, such as Mine, Popular, Frequent etc.
- Carry out steps 5 to 9, as above, but instead of copying to the Common folder, copy to the new folder that you have just created.
- You will also have to copy the elements, located in the common category, that you require. I suggest Image, Table. Horizontal rule.
You can add or remove the files as you please. If you wish to remove some of the files it would be wise to copy them somewhere safe, just in case you wish to replace them, at a later date.
Property inspector
Site File Window
The site window is where you can organise all your page, image and other files on your local site (hard drive) and your remote site (web server). At this stage you will work only with local files.
Diagram DW 1. After completion of Tutorial 2. Exercise 1. below
Note the following:
- The name of the site: my-first-web-pages. Produced in Step 1. Set Up your new Site, above.
- In the Local Folder, note the root folder my-first-web-pages, containing 1 file Index.html.
- Another entry will appear after completion of Tutorial 2. Exercise 2.
Document Window
Tutorial 2. Exercise 1.
My First Web Page between the title tags
Return to ![]() Tutorial 2
Tutorial 2
Programs
Video Editor
Filmora 10 Video Editor
Hosting & Domains
Hostgator
This site is hosted on Hostgator
123 Reg
Bluehost
Anti Virus Software
Kaspersky
Norton
AVG
Web Site Templates
DVD Tutorials
Books
CSS: The Missing Manual
CSS Pocket Reference
Html5 and Css3 All-In-One for Dummies
Web Design
Build Your First Website In Simple Steps
Responsive Web Design with HTML5 and CSS3

